

If you’re one of my dear “Constant Readers” (to borrow a turn of phrase from one of the masters), you may have seen the post before.
A couple of times, in fact.
But, once again, one of my outlines got a fair amount of attention on social media recently, with a lot of questions about how it’s done.
I did my best to answer those questions as succinctly as possible, but the character limit doesn’t do it justice. So, I’m sharing this again for the newbies who want a deeper look at how I do this (now updated with images with the progress of the outline I’m currently working on!)..

So, hold on to your butts, ’cause this one is gonna be a bit longer than usual. But if it helps one aspiring author create their own outline, then it’s worth it!
So, below you’ll find some explanations and some history on how I found this, and why I do it. But, if you just want to jump directly to how I apply it all to my outlining technique, you can skip to down to it by clicking here.
Hardcore Plotter
For those of you who are readers and not writers so much, when it comes to writing a story, there is something of a spectrum regarding the planning process (or lack thereof). On one end, you have the “Pantsers.” These are the writers who sit down and just start writing, pouring their heart and soul out onto the page without any kind of road map to guide them. They write “by the seat of their pants.”
These writers truly mystify me. How do you make sure you hit the structure points when you need to? How do you ensure your theme is consistent throughout the story? How do you end up with a cohesive story at all? But they do. I have deep respect for this thing that I do not understand.
And the reason I don’t understand Pantsers is because I am at the far other end of the planning spectrum; a hardcore “Plotter.”
Before I ever started my first outline, I consumed everything on the topic from Helping Writers Become Authors (there’s going to be a lot of references to this site in this blog entry, so hold on tight!). K.M. Weiland is a masterful teacher and I could not figure out how to even begin until I read all she had to say.
I started with a deep dive into her series on Novel Outlining, which I won’t go into detail here, and instead recommend you give it a read yourself if you’re interested. From there, I moved to her series on Story Structure and Character Arcs.
It was only after this study I felt capable of beginning.
My Process
Vague Notions
I generally start with a vague idea I want to write about. This is usually a concept or theme, but can sometimes be a character or even a setting.
From there I do detailed character bios. Sometimes this is just their history or backstory, other times I do a sort of interview with the the character (check out helpingwritersbecomeauthors.com for some great character interview tips). Then, depending on the story, I need to flesh out the setting where it will take place. Sometimes this is really basic, like if I’m writing a horror that takes place in a contemporary time and place. Other times this can take longer and be more complicated than creating the characters–like if I’m writing an epic space-western that takes place several hundred years in the future on a station floating in the clouds of a gas giant that mines technobabble from the atmosphere.
On the occasion a theme or concept was not the driving force behind the story, one usually emerges during the character and setting creation process. And once I have all three fairly solid, I move on to my favorite part of the entire writing process: outlining the story.
Story Structure
From K.M. Weiland, I learned that nearly every popular story you’ve ever consumed, be it in book form or movie and television, has pretty much stuck to an eight-point structure:
- Inciting Event (or Catalyst, if you prefer)
- First Plot Point
- First Pinch Point
- Midpoint
- Second Pinch Point
- Third Plot Point
- Climax
- Resolution
In a nutshell, the inciting event is your protagonist’s first brush with the larger story; one they usually want no part in, and outright refuse. The first plot point marks the beginning of the second act and is an event that thrusts your character into the story, usually kicking and screaming against their will. The first pinch is an event that reminds both the reader and the characters of the antagonist’s ability to win in the end. One great example of this is from Star Wars, when, after hiring Han Solo and Chewbacca to take Luke and Obi-Wan to Alderaan, they are chased out of the Mos Eisley spaceport by stormtroopers and Star Destroyers.
The midpoint is, as the name suggests, the middle of your story. Here, everything changes. The characters go from reacting to what’s happening around them to actively doing something about it. The second pinch point is just like the first (in A New Hope, this is the trash compactor scene).
The third plot point is the beginning of the third act and the beginning of the end. Again the story changes with a decision by the characters to confront the antagonist and theme of the story. The climax is where the ending really gets cooking. Readers probably know what’s coming, but doubts sneak in.
And finally, wrap everything up in a neat bow for the resolution.
Easy, right? Well, for my outline, this is only the first layer. Next comes character arcs.
Character Arc
While the structure is the bones of your story, the character arc is the heart and soul. This is where you show how your characters are changed by what’s happening, and prove your theme. I won’t go into too much detail on this, as that’s multiple blog entries all on its own, but once again, I suggest you to read K.M. Weiland’s series on the subject.
Act 1
In short, when it comes to character arcs, there are 6 things you should touch on in the first act before you reach the first plot point:
- Reinforce the lie about the world your character believes.
- Show their potential to overcome this lie.
- Show their first steps towards learning how to overcome the lie.
- Give them an inciting event to refuse.
- Evolve their belief in said lie.
- Make them choose to become a participant in the story.
First Half of Act 2
During the first half of the second act, between the first plot point and the midpoint, there are four things you’ll need to include:
- Give your characters the tools they need to overcome their lie.
- Show them having trouble continuing in the lie.
- Move them closer to what they want, and further from what they need.
- Give them a brief look at what their life could be without the lie.
Midpoint
The midpoint is the centerpiece of your character’s arc. Here, they are caught between the lie they believe and the truth they need to realize. Give them a mirror-moment, or “moment of grace,” where, for the briefest of instants, they can see the truth. But they’re not ready to embrace it yet.
That’s what the second half of Act Two is for.
Second Half of Act 2
Now that your character has seen the light, so to speak, there are a few things they need to do throughout this third quarter of your story. In the second half of the second act, there are six things you should do:
- Allow your character to act in more enlightened ways.
- Trap them between their beliefs in the old lie and the new truth.
- Start their (clumsy) attempts to escape the effects of their lie (and fail).
- Show how they have already started to change with “before and after” scenes mirroring their attitude before the midpoint.
- Give them a false victory.
- Blatantly lay out the whole point of their arc.
Act 3
Finally, your character is ready to embrace the journey of change they’ve been on throughout your story. Here, in the third act, there are four things you should show to prove they’ve changed:
- Up the stakes to the extreme.
- Keep your character off balance and on their toes.
- Prove just how far they’ve come since the beginning.
- Attack their belief in their newfound truth.
Finally, in the climactic moment, your character can prove their fealty to the truth in a satisfying and believable way, where they reject the old lie, and embody the new truth.
My Outlining Technique
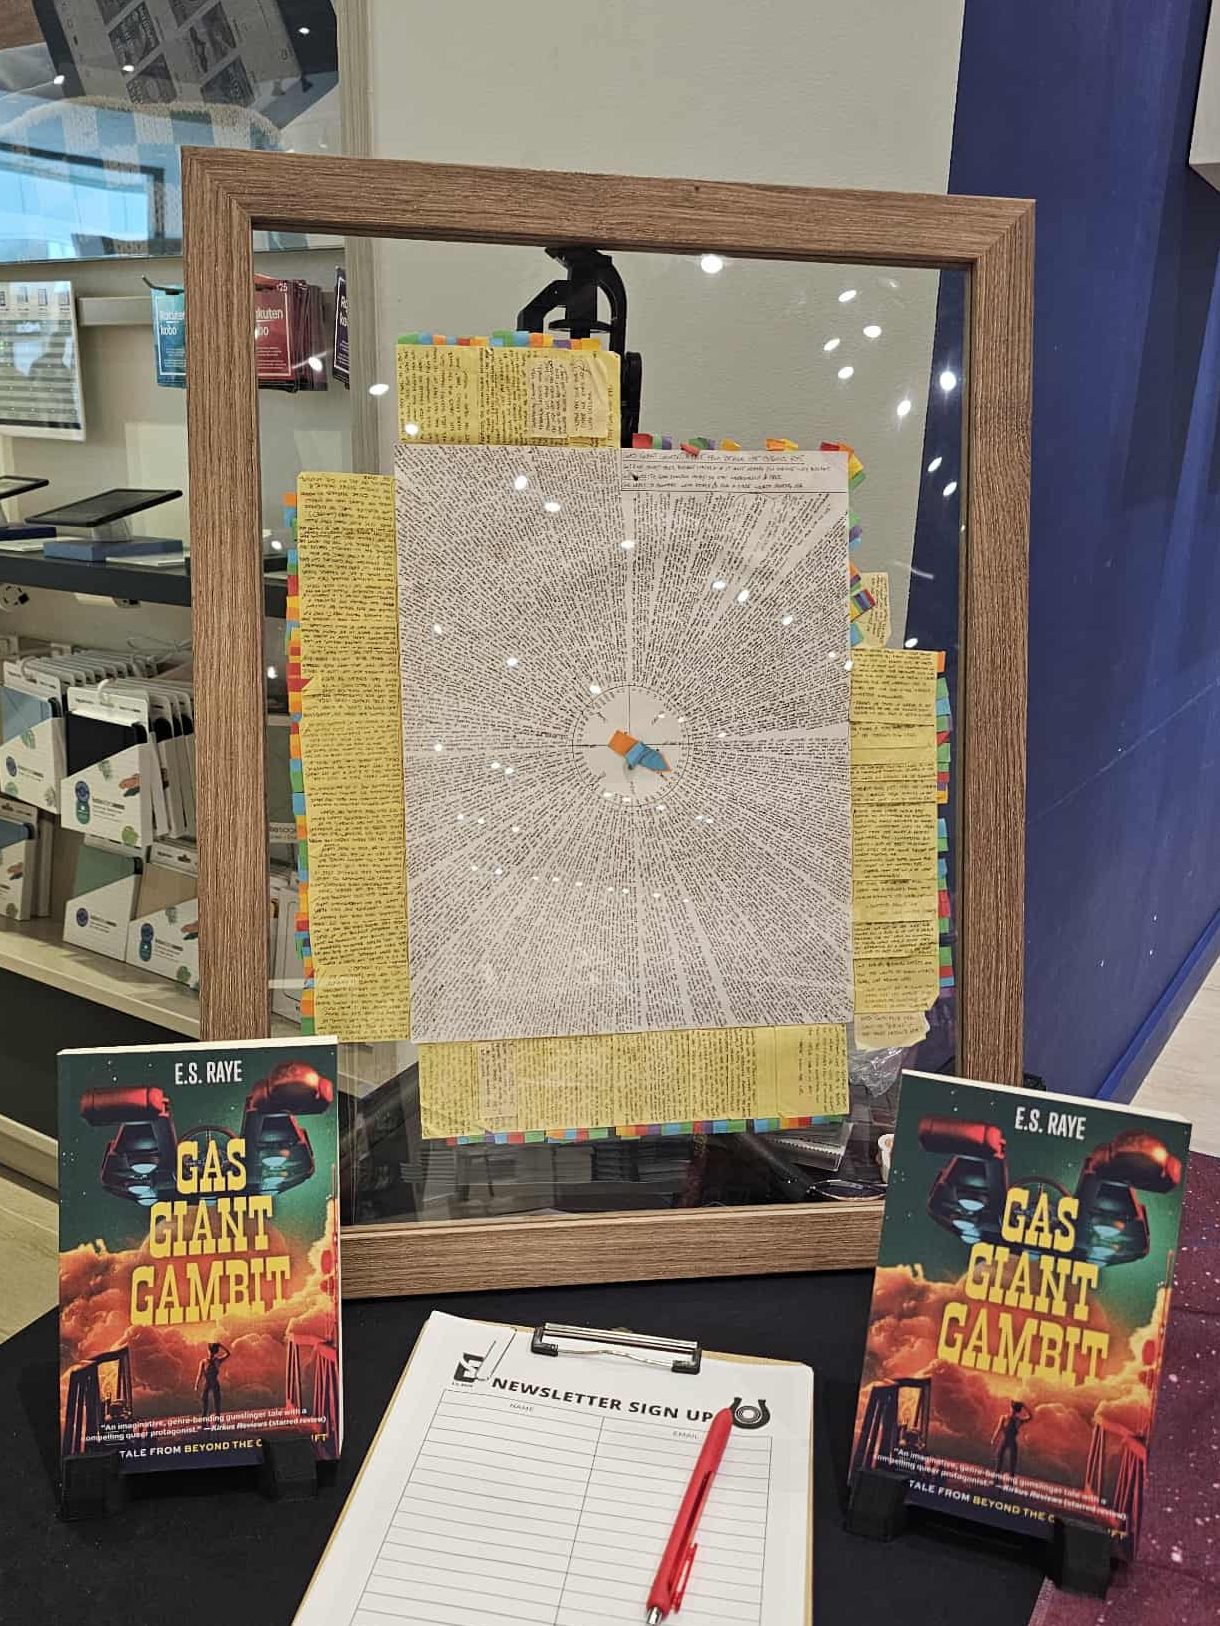
This may all seem like a lot–and it is. But with character arc laid on top of story structure, if you’re like me, you’ll find there isn’t a lot of extra space to get lost along the way.
When designing my outlining process, I decided on this pie shape to help me best visualize my character’s “before and after” mirror moments. This helped me make sure she was changing through the story.
From there, I needed to know how many wedges there should be. I start with a total word count goal. In the case of Gas Giant Gambit, I was aiming for around 100,000 words. With that number in mind, I divided it by 2,000 words, which I felt was a good number for each scene (or wedge) (in reality, some ended up being longer and others shorter, but this was a good starting point), which gave me 50 wedges in my pie. And then I added one extra so I could have the same number on either side of my midpoint. That gave me 13 wedges per quarter.

I started with the big story structure moments, filling them in briefly. Then added in the character arc stuff. Depending on which quarter of the pie I was in, that alone took up nearly half (or more) of the wedges. The rest is just filling in getting from point A to point B.
Below is the outline I am currently working on, and you can clearly see how it starts vague, but becomes increasingly complex.


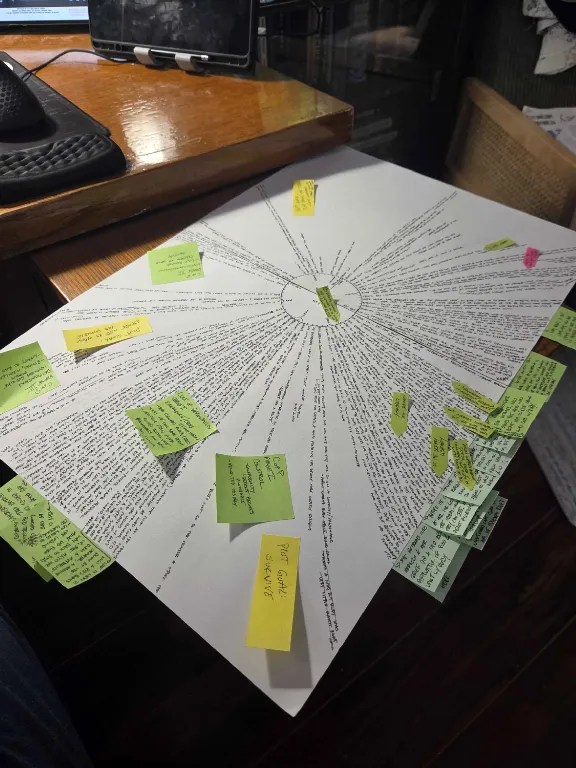

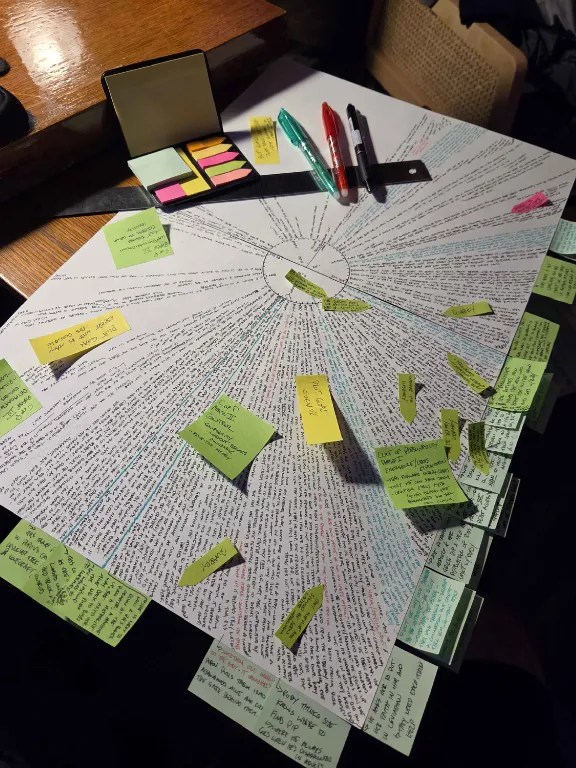
It’s a complicated process, to be sure, but when I’m done I have a detailed road map that is comprehensive and hits all the necessary points.
For some, this may take away the joy of finding the story along the way, but for me, this is the most fun part and it helps me find and fix any plot holes or other problems before I ever bring fingertips to keyboard.
So, there you have it. That’s how I outline. It’s long and arduous, and definitely not for everyone, but it’s my process and I’m sticking to it.
In closing, let me once again rave about K.M. Weiland’s work on Helping Writers Become Authors. Pretty much everything here comes from her work, with the exception of applying it to a pie shape. I highly recommend reading her stuff to get much more into the nitty-gritty of story structure, character arc, and outlining in general.


Leave a comment